How To Track Adjusted Bounce Rate

Most marketers are aware that Google Analytics ‘bounce rate’ is a pretty crappy engagement metric. Possibly not everyone knows there’s an easy way to get a much more useful metric from Google Analytics – ‘adjusted bounce rate.’
What’s The Problem With Bounce Rate?
If you aren’t aware of the issue with bounce rate, let me explain it. Bounce rate simply reports on users that visit a page on your site, then bounce off again without visiting another page.
Intuitively, you think of this as a user landing on the page, deciding ‘this page is not right for me’, and bouncing straight off again.
However, in many cases it is possible for users to be engaged in a page, get the exact answer they were looking for, and have no reason to browse any further. They might spend several minutes consuming the content before moving on (‘bouncing’).
Traditional bounce rate does not take this kind of ‘dwell time’ into consideration, which is where adjusted bounce rate comes in.
Adjusted Bounce Rate
Traditional bounce rate treats all pageviews as equal, whether the user visited for 2 seconds or 2 minutes. Adjusted bounce rate takes this into account, by firing an event once a user has spent a certain amount of time on the page.
Once the event is executed, the visitor is no longer counted as a ‘bounce’. You determine the amount of time it takes to trigger the event – for some websites 10 seconds might be appropriate, for others it might be minutes.
You end up with a bounce rate that is a much better reflection of true engagement of your webpages.
How To Implement Adjusted Bounce Rate
It is pretty straightforward to get set up, you just need to add the following line to the bottom of your Google (Universal) Analytics code:
setTimeout("ga('send','event','adjusted bounce rate','page visit 30 seconds or more')",30000);
As you can see, this makes the requirement 30 seconds (30,000 milliseconds) before the event is fired, but you can easily adjust this yourself.
You can see this in action by looking at the Analytics code for this website:
The labels you use for this event are not important – you can use whatever you wish. It is the act of triggering an event that stops Analytics counting a visit as a bounce, even if they don’t visit more than 1 page (indeed, you could send any event). Thanks to Cully Larson for pointing this out in the comments.
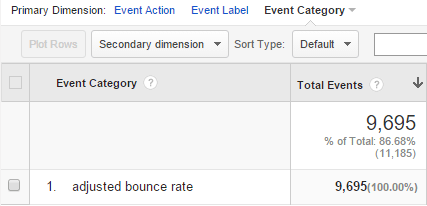
The event can be tracked as any other event in Google Analytics:
Glenn Gabe wrote a post over on Search Engine Watch describing how to implement adjusted bounce rate via Google Tag Manager (in case you are a fan of Tag Manager).
How Long Should I Set My Timeout?
It’s perfectly valid to go off gut instinct on how long to set your timeout – no one knows your users better than you do. However if you want a more data-driven approach you can check the Engagement Report in Google Analytics.
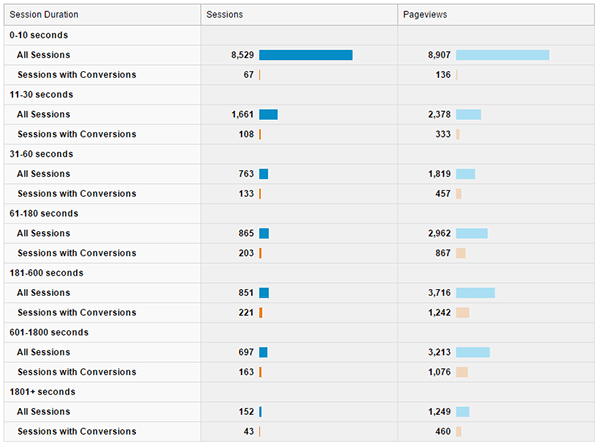
Go to Audience -> Behavior -> Engagement, then add the segment ‘Sessions with Conversions’, to get a report that looks like this:
 In our case, above, we can see that the majority of conversions happen when visitors spend more than 30 seconds on the page, which is why I chose to set 30,000 milliseconds as the timeout.
A More Accurate Engagement Metric
If you are interested in making more money from your website, you should be looking at engagement metrics to help judge your success. Adjusted bounce rate is simply a more accurate measure of engagement than traditional bounce rate.
And if you’re not looking at engagement, you probably should be…
Anyone that has dealt with sites affected by Panda will have probably noticed poor engagement metrics on affected pages (I wrote about this previously), and it is pretty much accepted in the SEO community that Google calculate engagement metrics such as dwell time to help measure how successfully a page satisfies a given search query.
So there are plenty of good reasons to start measuring your engagement better – go off and do it! You’ll be rewarded with a much more pleasant set of engagement statistics to boot.


