How to Find Google Indexation Gaps in Your Sitemap
URL Profiler has a Google Index Checker feature, which allows you to check if any URL is indexed by Google.
This means that you can literally take your sitemap, dump it into URL Profiler, and confirm if all your pages are properly indexed. Pretty sweet, right?
Not always.
If you have a site with a few hundred pages, this is fine. A few thousand, and you can do it if you’re careful with your proxies. On bigger sites than that, however, you’re going to struggle.
Identifying Indexation Issues
In most cases, indexation issues fall into 2 camps:
- There exist URLs that are not indexed that you do wish them to be.
- There exist URLs that are indexed that you do not wish them to be.
In this post we will be examining the first issue, as this is a situation that URL Profiler can help with.
Identifying Indexation Gaps
This is the instance where, if you have a small site, running every URL through URL Profiler’s indexation checker is ideal. You will basically end up with a yes/no response for every URL on your site, allowing you to isolate and examine all the ‘nos’.
On a larger site, checking every URL is not really feasible (or advised). The quickest and easiest way to check for this type of indexation issue is through Google Search Console.
Google Search Console – Sitemap Report
Your XML sitemap is your opportunity to tell the search engines exactly which of your pages you want them to index. It is a clear, overt message: “Please crawl and index these pages.”
As such, it should contain every URL you wish to be indexed. Therefore, if some of these are not indexed, you fall squarely into ‘Case #1.’
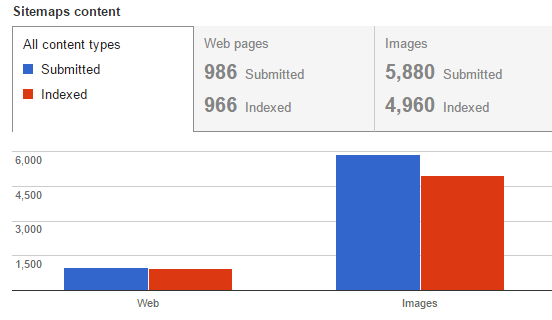
The sitemaps report in Google Search Console (Crawl -> Sitemaps) is your go-to report for checking this sort of thing.
While it won’t tell you exactly which URLs have, or have not, been indexed, you can certainly get an idea of whether there is a problem or not.
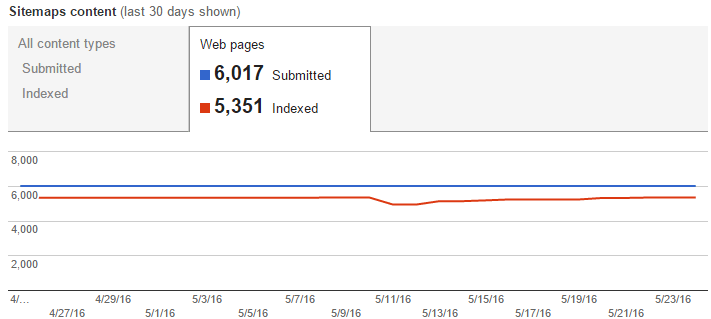
You can click through to get a specific figure for the number of indexed pages from your sitemap.
Although it is quite rare to see 100% indexation from a sitemap, you clearly want this figure to be as close as possible to the number submitted. If it is a lot lower, you may have a problem you need to investigate.
Pro Tip: Optimize Your Sitemap Index
You can get much more granular data on indexation if you split up your sitemap into a sitemap index, with different page types in different indexes (e.g. you have a sitemap for categories, and another one for products).
This makes the breakdown in Google Search Console much more useful.
For further reading on this method, this post on Distilled covers a range of different ways in which you might want to slice up your URLs into meaningful sitemaps.
Filling in the Gaps
In reality, I have not seen many sitemaps set up like this when I come to do a client audit. This means we don’t have highly granular data on which types of URL are indexed, and if we do spot a problem, we need to turn to other methods to identify where the indexation gaps lie.
As I mentioned at the beginning of the post, you could just dump every single URL in your sitemap into URL Profiler and check each one for Google Indexation. However, I have already written about the perils of proxies in this day and age, so if you have a lot of URLs to check, this could turn into a very expensive (and frustrating) endeavour.
In order to minimise the dependence upon proxies, we can use Google Analytics and Google Search Console data to approximate indexation.
In effect, we will use ‘visits from search’ or ‘impressions’ as a proxy for indexation. I know, I have just deliberately confused matters by using the other meaning of ‘proxy’…
Sorry, I couldn’t help myself.
Google Analytics
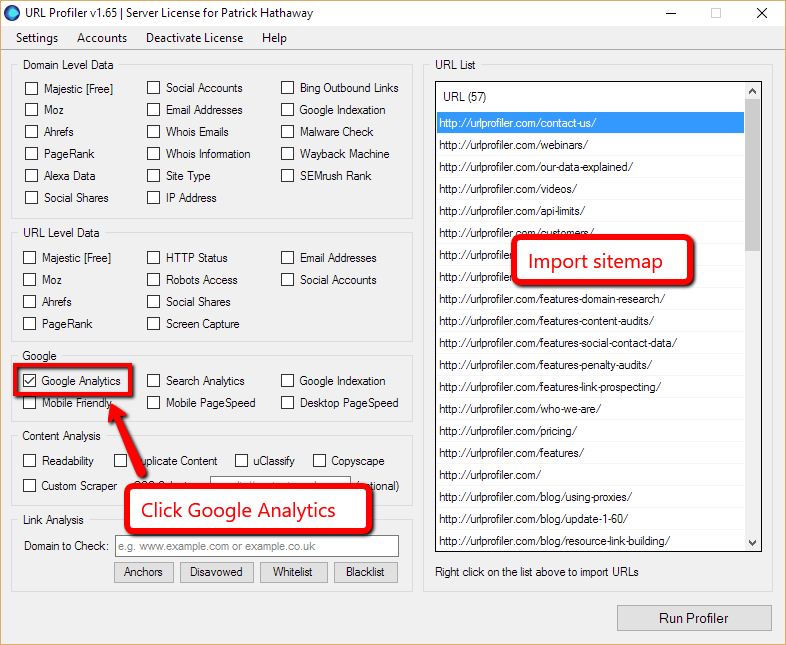
Let’s start with Google Analytics. In URL Profiler, right click in the white box and import your XML Sitemap to populate the URL List. Then click ‘Google Analytics.’
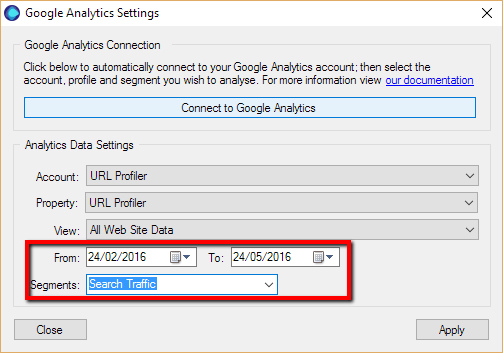
Then, select the correct Account/Property/View. Adjust the date range to give you 3 months’ worth of data or so, and then select ‘Search Traffic’ from the Segments dropdown.
Hit ‘Run Profiler’ and let URL Profiler do it’s thang, then return seconds later when it has finished.
Open the spreadsheet in Excel, then go to Data -> Filter. Filter on the column ‘GA Status’, and choose to only show the ‘Not Found’ option.
In this example above, I only had 1 URL which was listed as ‘Not Found’. This means that, for every single other URL, there was organic search traffic data in the API (for the time period selected).
The only way a URL can get clicks from search is if it is indexed in the first place. Clearly, this is not a 100% accurate check, but it is a pretty good estimation.
Say you started out with 10,000 URLs, if 3,000 of them were listed as ‘Not Found’, you can be fairly confident that the other 7,000 are indexed, and tick them off your list.
Then proceed with the remaining 3,000 to the next stage.
Search Analytics
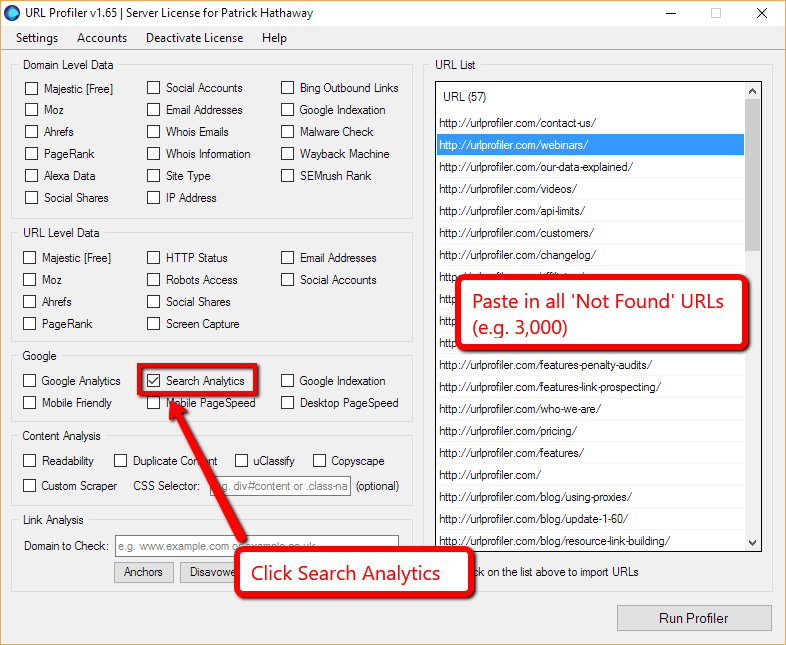
We can do the same thing here, except use ‘Impressions’ as our proxy (again, the other meaning of proxy). The only way a URL can get impressions from search is if it is indexed in the first place (although, it may not necessarily get any clicks from these impressions).
With URL Profiler, we do the same setup as before, except this time choose ‘Search Analytics’.
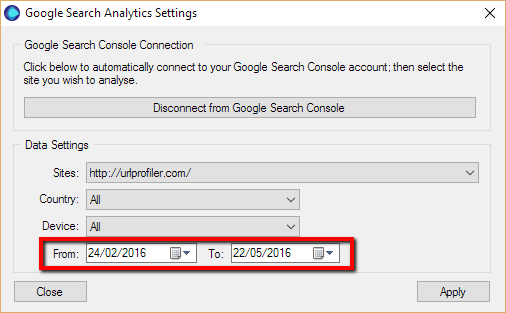
Then, from the Search Analytics settings, again give yourself 3 months worth of data to look at.
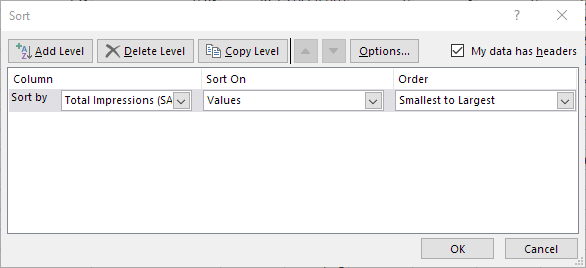
Once the Excel sheet comes back, open it up and navigate to the ‘Results’ worksheet, then Data -> Sort, and choose ‘Total Impression’, sorting ‘Smallest to Largest.’
This time, you are looking for any 0s in the column ‘Total Impressions (SA)’.
In the example above, we have 2 URLs with zero impressions. This means that, every single other URL has had impressions in search, indicating that they must be indexed.
If we brought 3,000 URLs forward, this might have now dropped to only 1,000.
Using the Indexation Checker (Finally)
Only once the 2 steps above have been carried out – checking Google Analytics and Search Analytics – do we recommend that you utilise URL Profiler’s Indexation Checker feature.
This is purely to ensure you don’t accidentally burn out your proxies (in fact, if you are using proxies at all, please read our proxy usage guide).
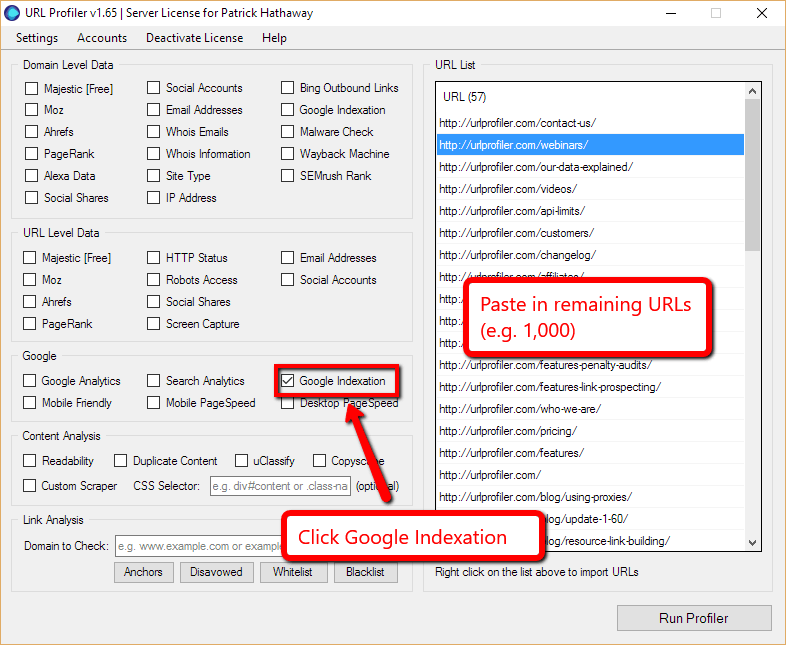
Having successfully reduced the size of your list, you can ensure you only check the minimum number of URLs, thus reducing the risk of your proxies burning out.
Load your final set of URLs in URL Profiler, and click ‘Google Indexation.’
With this report, you are looking for the URLs that are listed as ‘Nos’ under the column ‘Google Indexed.’

And this will give you your final list of URLs which are not indexed, allowing you to go off and figure out why not(!)
Fixing Indexation Gaps
Once you have isolated which pages are not indexed, you will then need to find out why they haven’t been indexed, and what you need to do in order to get them in the index.
Crawling and indexing, while being different processes, are fundamentally linked. By default, if a web page is crawlable, it is also indexable. Web crawling is Google’s primary method of URL discovery, and it is through crawling webpages that allows Google to build their index.
This means that solving indexation problems often requires you to solve crawl problems – pages aren’t getting crawled or indexed due to issues with your site architecture.
This is a topic that is far outside the scope of this post, and often also very case specific, so I shan’t try and tackle it here. Before you go down that route, however, it is worth checking out this checklist from David Sottimano – Advanced SEO troubleshooting: Why isn’t this page indexed?

